


We may receive a commission when you use our affiliate links. However, this does not impact our recommendations.
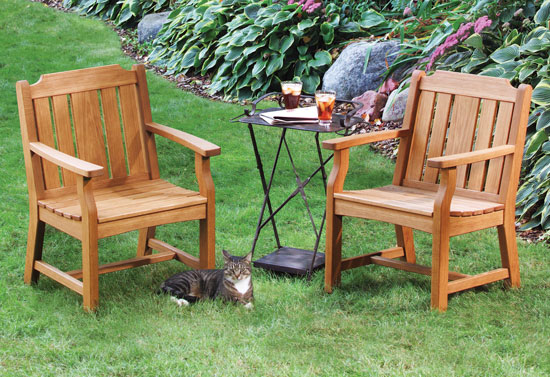
St. Croix Valley Chairs
Enjoy your setting while comfortably sitting.
By Tim Johnson
Stylish and comfortable, these chairs are also built to last. Made of We’ve engineered the building process so you’ll be able to fit every Every structural joint consists of two plunge-routed mortises joined |
You may also like… |

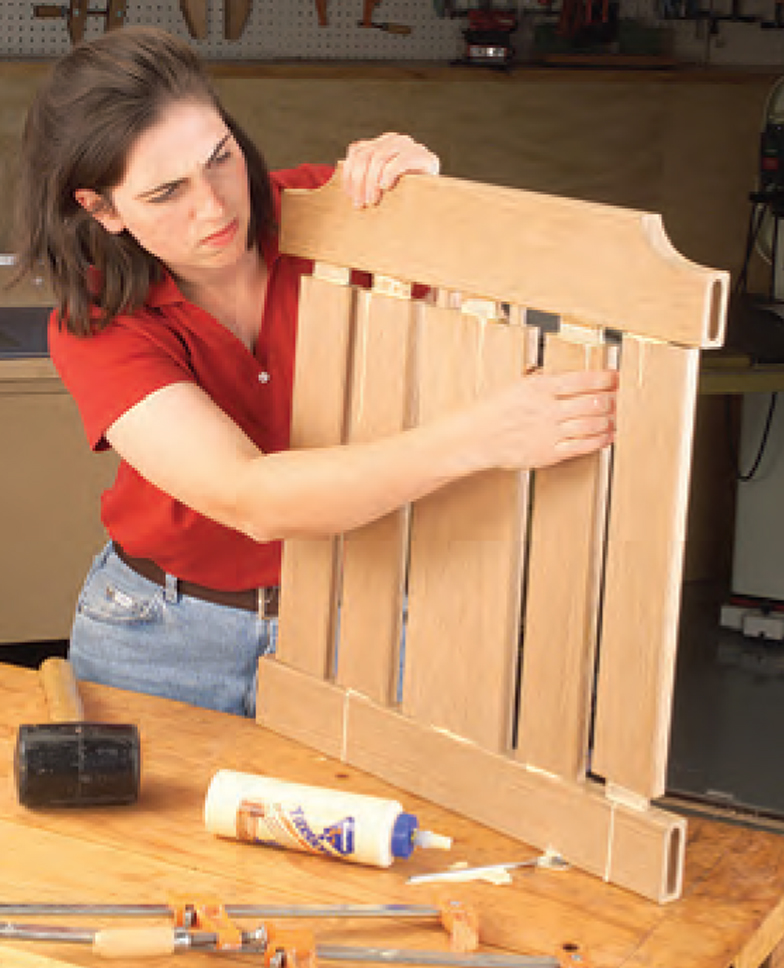
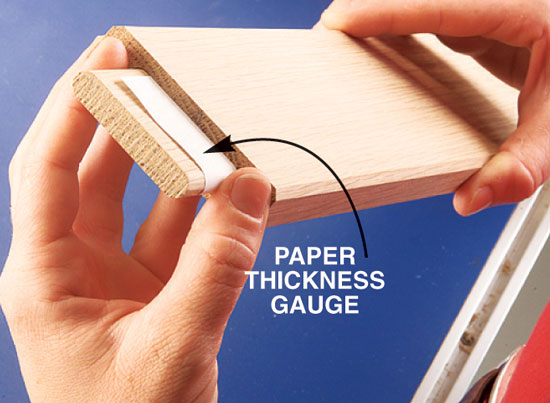
Lumber and toolsWhite oak is a bargain compared to other rot-resistant hardwoods like teak and mahogany, and it’s readily available in a variety of thicknesses. We used 8/4 stock for the legs (wide boards so we didn’t have to glue up the blanks), 6/4 for the arms, rails and stretchers and 4/4 for the slats and tenon stock. For dimensional stability, we chose boards with straight grain. Each chair requires about 35 bd. ft. of lumber. We paid $160 per chair for our rough-sawn stock. Routing all the mortises will give your plunge router a real workout. It must have a 1/2-in. collet, an edge guide, 2-1/8 in. of plunge capacity and the guts to plunge deep in white oak (at least 1-1/2 hp). This project also requires a tablesaw and bandsaw, a drill press with a sanding drum and a router table. You’ll need 3/8-in. and 1/2-in. straight bits for mortising, a 2-in. flush-trim bit, a 1/4-in. round-over bit and a chamfering bit. A jointer and planer are recommended, but not essential. You can have your stock milled to thickness at the lumberyard. Building tipsSquarely-cut blanks are essential for sound joinery and good results. Make sure your tablesaw’s miter gauge makes square crosscuts. The heavy leg blanks may require a crosscut sled or an accurate chop saw. Use templates to duplicate the shaped legs, arms and seat rails (Fig. D – G, page 84). 1/2-in.-thick MDF is excellent template material (available at most home centers for $5 per 2-ft. x 4-ft. sheet). Use layout marks to guarantee that mortises and adjoining pieces go where they’re supposed to go. Plunge-rout the mortises, using a straight bit, an edge guide and clamped-on stop blocks. Mortises are either routed into the end grain using a jig, or into the long grain, using a flush-mounted support block. Rout mortises before you cut profiles. It’s much easier to fit the angled joints around the mortises than vice-versa. Always rout from the same face so all the mortises in each piece are consistently located, even if they aren’t perfectly centered. Then the joints will always line up. Simply mark all the edge-guide faces with arrows before you rout (Photo 3). Make templates for the legs把腿从空白模板匹配的leg blanks (Fig. D). For the best results, saw straight portions of the templates on your tablesaw (Photo 1). Bandsaw curved shapes oversize and finish them using a sanding drum in your drill press. To cut the back side of the back leg template on your tablesaw, you’ll have to make stopped cuts from each end. Finish by cutting the remaining middle section on your bandsaw. When you cut the inside edge of the front leg template, stop the tablesaw cut at the beginning of the curve and cut the rest on the bandsaw. Mark the leg blanksBefore tracing the template profiles onto the leg blanks, make sure the template and blank are aligned. The front leg template (Fig. A, below, Part A, and Fig. E) is easy to position, but the only reference surfaces for the rear leg (Fig. A, Part B, and Fig. D) are at the middle of the front edge and on the bottom. After tracing the profiles, clamp the front and back leg blanks together. Then mark the locations of the mortises and outside edges of the seat rail (C), side stretcher (D) and arm (E) on the front leg blanks (Photo 2). Mortise the back leg blanksFirst, adjust your router’s edge guide to center the mortises on the edge of the blanks. Then rout mortises for the seat rails (Photo 3). To rout mortises for the stretchers and arms, steps have to be cut to get the router close enough (Fig. B, below). To create the steps, first make a stopped cut on the tablesaw (Photo 4). Finish cutting the remaining angled portion of the step on the bandsaw, making sure to stay on the outside of the line. Extend the mortise layout lines onto the steps. Then rout 2-1/8-in.-deep mortises for the arms and stretchers (Photo 5). Shape the back legsFirst, rough-saw the back leg on your bandsaw to the outside edge of the pattern line. Then fasten the template with heavy-duty double-faced tape, making sure it’s flush with the leg at both the bottom and front edges. Shaping the legs requires some routing against the grain, which can cause tear-out. For the best results, mount the template on the right side of the blank (when viewed from its front edge). This setup limits against-the-grain routing to the less-visible lower portion of the leg (Photo 6). Finish the back legs by routing the mortises for the back assembly on their inside faces, using extensions to support the router. The extensions must be as thick as the leg and clamped in line with its edge (Photo 7 and Fig. K). Be sure to adjust your edge guide before routing. Complete the front legsFirst, rout centered mortises for the arms, using a jig (Photo 8 and Fig. C, below). These mortises are offset because they’re routed before the profiles are sawn. Saw steps in the front leg blanks so you can rout the seat rail and stretcher mortises. Make stopped tablesaw cuts (on the outside edge of the pattern line) from the bottom of the blank to the start of the curve at the top. Bandsaw the remaining curved profile. Attach support and stop blocks and rout the mortises. Rough-saw the outside curve at the top of the legs. Then mount the template (on the right side of the blanks) and rout the front leg profiles. Mortise the seat rail, stretcher and arm blanksThe seat rails, side and center stretchers (L) are all the same thickness, so they can all be routed with the same set of cleats mounted on the end-mortising jig (Fig. C, Detail 1, below). First, rout 1-1/4-in.-deep mortises in the seat rail blanks (Fig. G), centered between the faces and offset from the top edge. Be sure to rout both ends from the same face. 重新定位右手夹和1-1/2-in扰乱。-deep mortises in the stretcher blanks (Fig. H, below). Mortise one end of both arm blanks (Fig. F). This job requires its own set of extra-wide cleats and support blocks (Fig. C, below). Make the loose tenonsIndividual 1/2-in.-thick tenons (Q through X) are cut from long pre-milled blanks. First, plane 2-ft. lengths of straight-grained stock to 1/2-in. thickness and rip them to width. Then shape the edges on your router table (Photo 9). Your tenon stock should slip in and out of the mortises without binding (too tight) or rattling (too loose). Cut the tenons about 1/16-in. short and test-fit the seat rail and stretcher joints. Adjust the fit by shaving the tenons or wedging the mortises until the adjoining pieces line up with the layout lines. Fit the angled jointsFirst, find the cutting angle for the stretchers (see Real-World Angles Don’t Lie). Then transfer this angle to your tablesaw’s miter gauge using a sliding bevel square. Mark the stretcher for the angled cut (Photo 10) and cut it to length. Find the cutting angle for the back end of the arm. Tilt the blade to this angle. Reset your miter gauge to 90 degrees and cut the back end of the arm blank. Rout mortises in the side stretchers for the center stretcher (Fig. H). Then assemble the sides and install the arm blanks so you can locate and rout the front mortises (Photos 11 and 12). Assemble the sidesMount the arm blanks with tenons installed in both mortises. Trace the arm’s profile onto the blanks while holding the template (Fig. F) against the back leg, flush on both sides. Remove the arm blanks and rough-saw them. Then attach the template and rout the profile on the router table using the flush-trim bit. Rough-saw and rout both seat rail blanks using the template (Fig. G). Chamfer all the exposed sharp edges on the arms, legs, seat rails and stretchers. The chamfers stop above and below the arm joint on the back legs. Chamfer only the bottom edges of the seat rails. Don’t chamfer the ends of pieces that butt at joints. Then glue each side assembly together (Photo 13). Assemble the backRout 1-in.-deep mortises in the ends of the crest rail blank (F) and lower back rail (G), using the jig (Fig. C, Detail 1). These mortises are offset (Fig. J and Fig. K, below). Mortise the ends of the front rail (H) now as well. The 3/4-in.-thick back slats (J and K) require thinner mortises and tenons (Y and Z), but the plunge routing procedure remains the same. Draw layout lines on the rails (Fig. J), clamp on a fence and stop blocks, set the edge guide and always rout from the same face. Make sure the back slats are the right length. Dry-clamp the crest and lower back rails in place between the glued-up sides and verify the distance between them. Then mortise the ends of the slats using the jig (Fig. C, Detail 3, below). 带锯不尽的曲线轮廓t rail and smooth it on your drill press with the sanding drum. Next, chamfer all the edges (but not the ends) of the rails and slats. Make tenon stock to fit the 3/8-in.-thick mortises, using the 1/4-in. round-over bit, lowered slightly, to round the ends. For this 28-mortise glue-up, give yourself some wiggle room by making the tenons slightly undersize (see Oops!, below). Then rely on your layout lines to position the slats when you glue the back assembly together (Photo 14). After clamping, measure the diagonals and make any necessary adjustments to make sure this assembly is square. Glue the frame togetherDry-fit the chair frame and clamp it together. Then determine the exact length of the center stretcher by measuring between the side stretchers. Cut it to fit. Disassemble the chair and draw the shallow arch on the bottom of the front rail. Flex a yardstick or thin piece of scrap to use as a pattern. Bandsaw the arch and smooth it with the sanding drum. Glue the chair frame together on a level surface (Photo 15). Use your layout lines to make sure all the rails are in position. After clamping, measure the inside diagonals of the seat opening to check for square. Install the seatMake the seat subrails (M) and the seat slats (N and P). Screw the subrails to the seat rails. Glue and screw the front slat to the front rail, flush with the back edges of the legs. Then install the rest of the slats (Photo 16). The finishWhite oak is rot resistant, but left unprotected, your chair will turn gray and may feel somewhat rough, because exposure to moisture will raise the grain. If it stays damp for extended periods, mildew can be a problem. You can get rid of mildew and restore the oak’s natural color by treating it with a deck renewal product. Light sanding will smooth the surface. We chose an outdoor oil finish (see Sources, below) because it makes the oak come alive with color. It also offers a layer of protection against the elements, including mildew. You should plan to apply (brush on/wipe off) several coats of this finish every year. The most durable exterior finish is spar varnish, which also gives the oak a pretty color. It’s a brushed-on, high-gloss finish that will last for several years without peeling or cracking. You’ll have to sand it down before recoating. Oops!
My loose tenonsfit the mortises perfectly, but gluing the back assembly, with its 14 tenons and 28 mortises, turned out to be a nightmare. By the time I spread glue on all the parts, the pieces wouldn’t go together whether I clamped, hammered or prayed! This story originally appeared inAmerican WoodworkerJanuary 2004, issue #105.
|
Click any image to view a larger version.
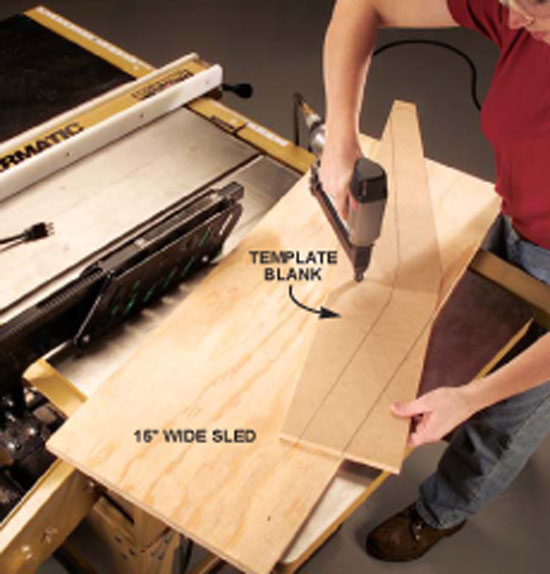
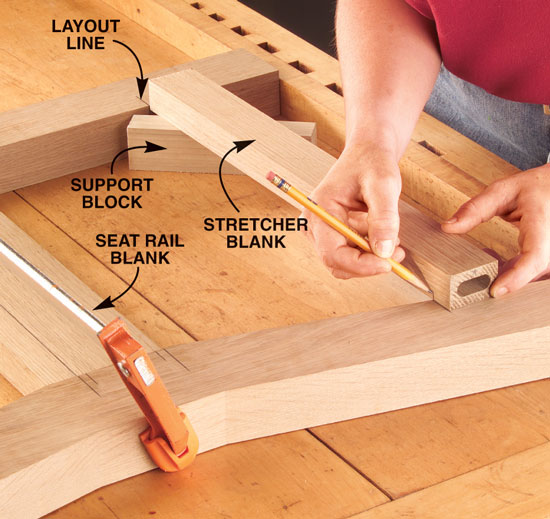
1. Make templatesso all of your duplicated parts will be identical. Cut the templates’ long, straight edges on your tablesaw, using a sled. First, set the fence and rip the sled to width. Then tack the template blank in place and run the sled through the saw.
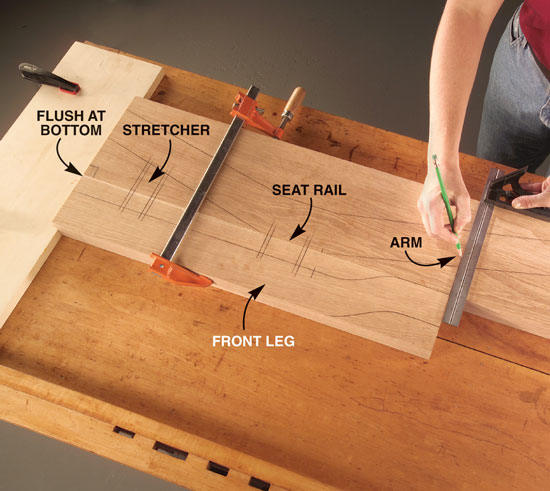
2. Locate the leg mortises.Marking both blanks simultaneously guarantees that the mortises will line up. Use the top of the front leg to locate the bottom of the arm on the back leg.
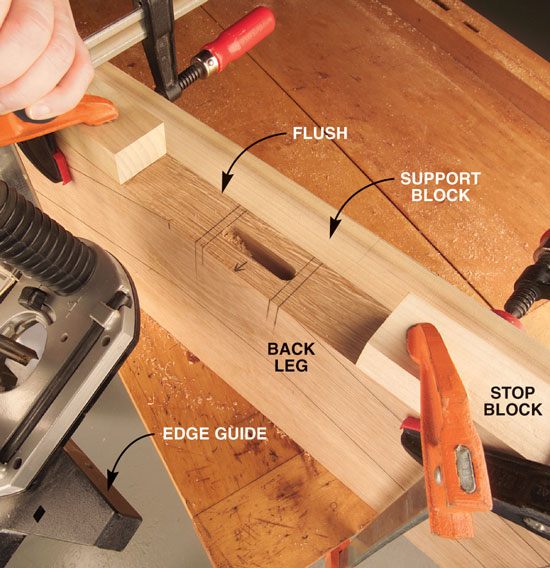
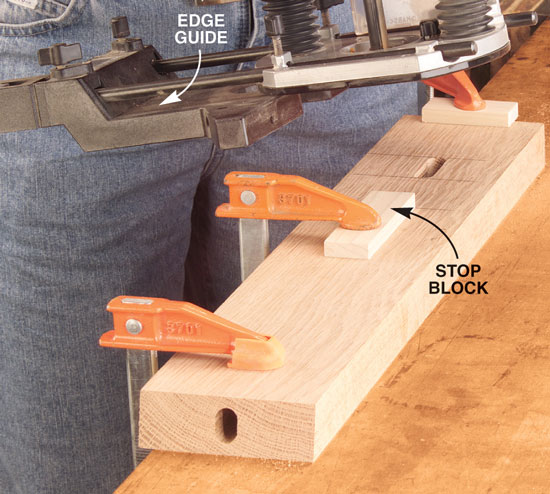
3. Rout mortisesfor the seat rails in the back legs with a plunge router. Clamp on a wide support block to stabilize the router and stop blocks to establish the ends of the mortise.
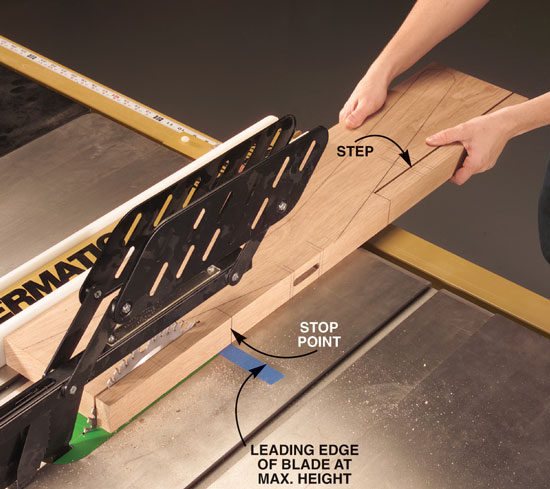
4. Cut stepsin the back leg blanks so you can rout the arm and stretcher mortises (Fig. B, below). First, locate the blade edge and the stop point. Then make a stopped cut. Turn off the saw and back the blank out after the blade stops.
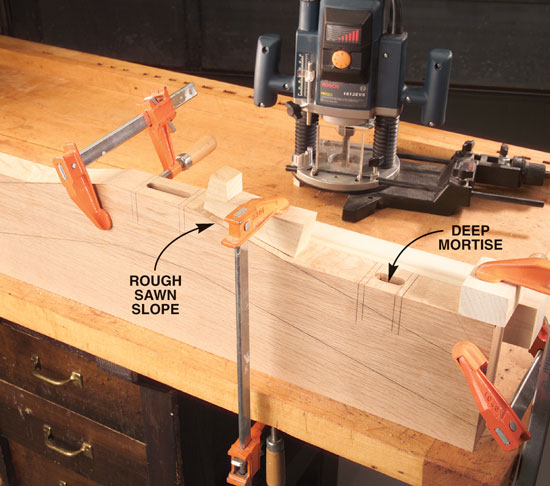
5. Rout super-deep mortisesfor the stretcher and arm from the steps, so a functional mortise remains when you cut away the waste. Rough-sawing the slope beyond the steps makes it easy to clamp on stop blocks.
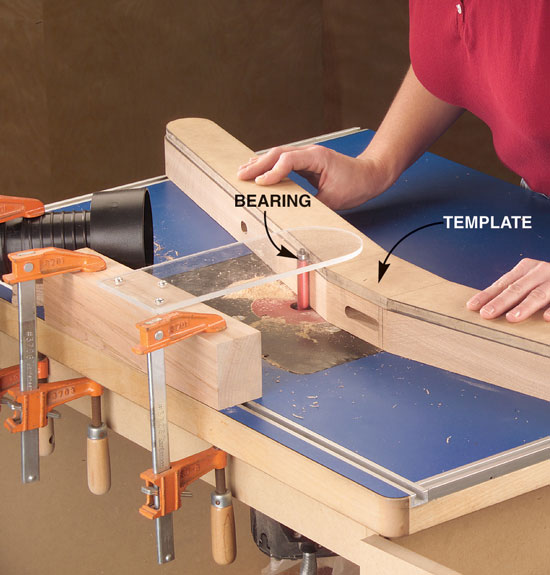
6. Rout the legto its final shape with a 2-in. flush-trim bit. Before you rout, rough-saw the blank and affix the template with heavy-duty double-faced tape.
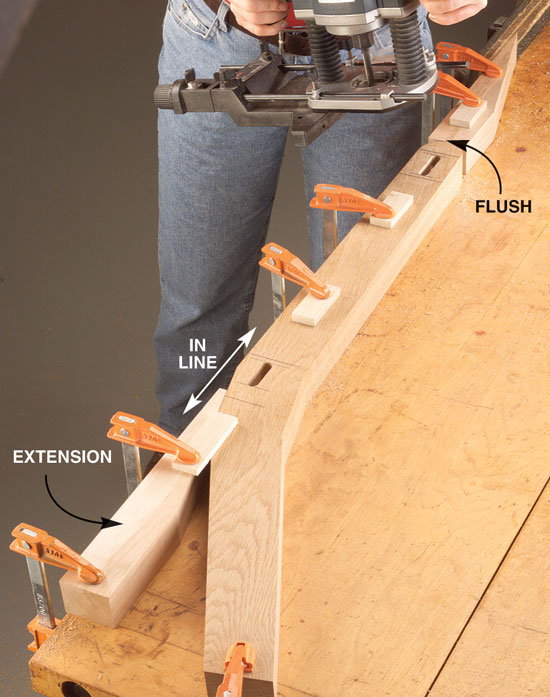
7. Rout mortisesin the back legs for the back assembly using extensions to support the router and edge guide.
8. Rout mortisesfor the arms in the tops of the front leg blanks using a shop-made jig to support the router (Fig. C).
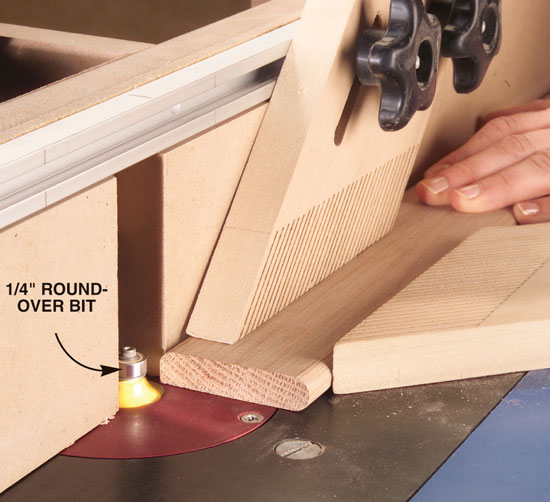
9. Shape loose tenon stockon the router table with a round-over bit, featherboards and a fence.
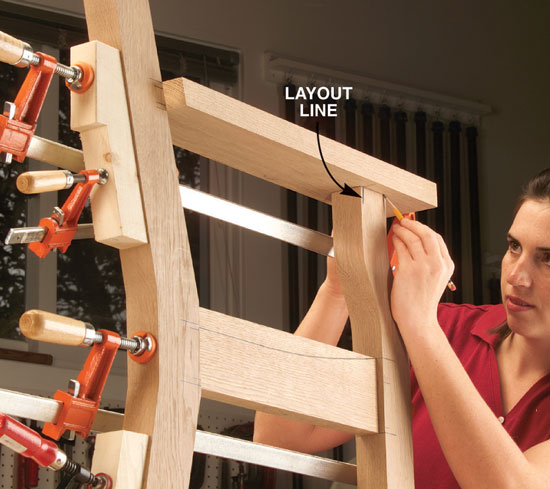
10. Cut the stretchersto fit after dry-assembling the legs and seat rail blank. Align the stretcher with the layout lines, butt its front end against the leg and mark the back end.
11. Locate the arm mortise.First, cut the bevel on the back of the arm blank. Install the loose tenon and clamp the blank to the back leg. Then transfer the layout lines for the mortise from the front leg to the arm.
12. Rout the mortisein the bottom face of the arm blank. It’s centered, just like the mortise in the end.
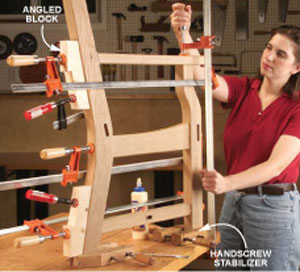
13. Glue the side assemblytogether standing up, so it’s easy to clamp and clean glue squeeze-out. Center the clamps on the joints using angled blocks to direct pressure squarely on the angled joints.
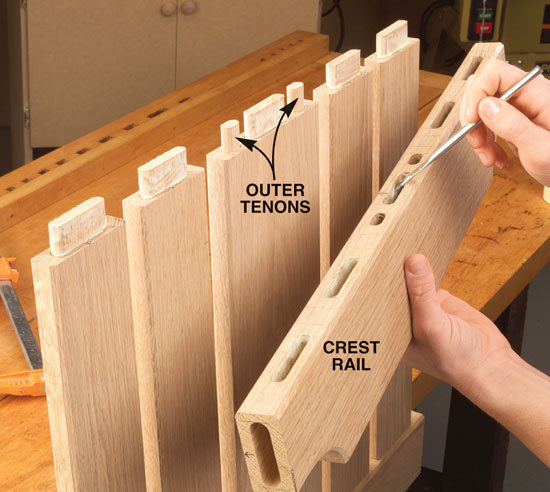
14. Glue the back slats and rails.To keep the wide center slat from cracking, leave its outer tenons unglued.
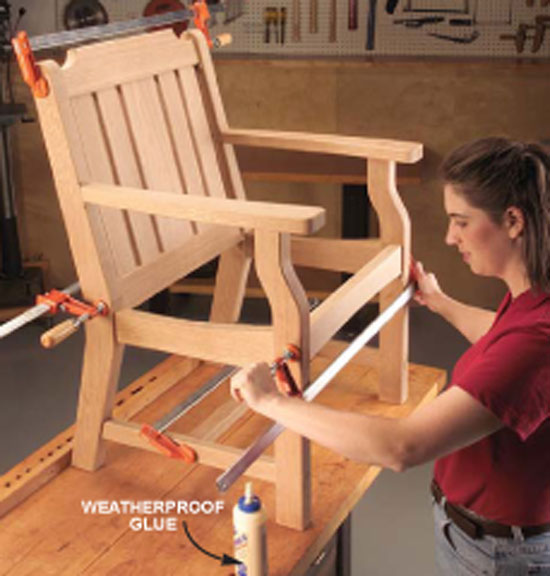
15. Glue the frame together.To ensure even clamping pressure on all the joints, center your clamps, keep them level and tighten them sequentially, one twist at a time.
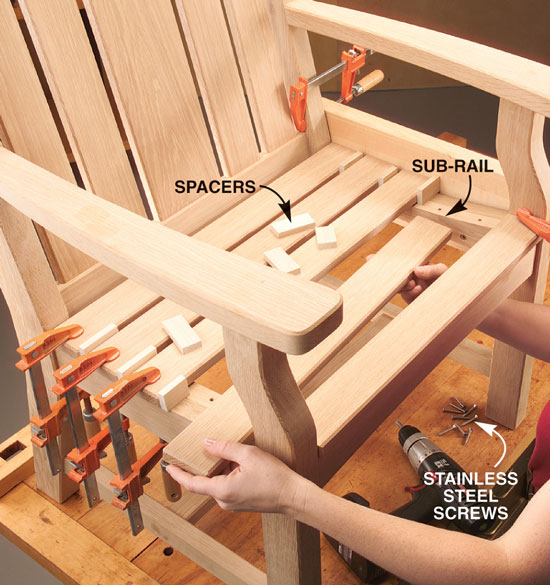
16. Install the seat slats, using spacers and a clamped-on board for alignment. Clamp the slats and fasten them from underneath, through predrilled, countersunk holes in the subrails. Real-world angles don't lie
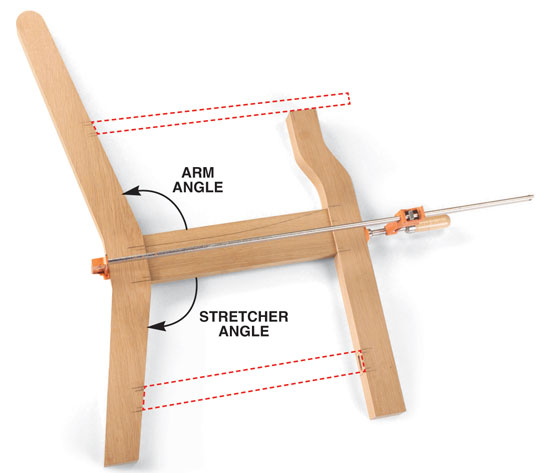
The old adage “divide and conquer”is apropos when you have to fit an assembly that includes angled joints, like the chair sides. Instead of cutting all the parts based on a cutting list, fit the joints one at a time. Dry-clamping the square joints between the seat rail blank and the legs gives you all the information you need to fit the angled joints. The angle for the back end of the side stretcher is the same as the angle between the bottom of the seat rail blank and the leg. The arm’s back-end angle is the same as the one between the seat rail blank and the top of the leg. |

Here are some supplies and tools we find essential in our everyday work around the shop. We may receive a commission from sales referred by our links; however, we have carefully selected these products for their usefulness and quality.


